Drew and Jonathan’s Great Gallery Wall Tips

This site contains affiliate links to products. We may receive commission for purchases made through these links. Price at time of publish date may change.
A gallery wall can turn a less-than-exciting wall into a creative focal point, and instantly draw eyes into the space. What’s more, it’s a beautiful way to incorporate personal memories through family photos; style and interest through artwork; and even show off your personality through unique wall decor. There are so many gallery wall ideas you can come up with, too, because the possibilities truly are endless! From your gallery wall layout to the pieces you decide to hang and the style you want to create, a gallery wall is like a personalized mood board put on display.
And you’re not just limited to just photos and artwork, either. Some of the most interesting gallery walls happen when you mix in other textures and three-dimensional elements, like macrame wall hangings or hanging wall baskets. We all know the Bros love to design gallery walls and arrange artwork. After all, staging the home after it’s redesigned is one of the most fun parts of renovating! So we called on Drew and Jonathan to create two different looks and talk through some of their best tips. Here, they explain their process behind the designs.
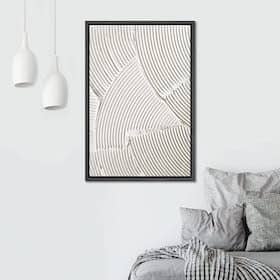
Jonathan’s Clean and Classic Gallery Wall

Jonathan: I went with a clean, classic look—just like me—using four black and white prints with black frames. The key here is centering the wall with furniture. You don’t want heads and arms bumping into the bottom frames, so we used painters tape to mark our furniture lines. With heavy frames like these, you’ll want some reinforcements, like Velcro hanging strips. You might want to check the width of the frame against the width of the strip, to make sure they line up. If you can, go at least one level higher on the supported frame weight listed on the packaging, just to be safe.
The other major factor is consistent spacing, which is even more critical in a simpler layout like mine. A tape measure is your best friend here, along with a good level. (You might even want two, a small and large one, if you have them.) Once you’re in good shape, step back and use the best tool available: your sharp eye. If it looks right, it probably is.
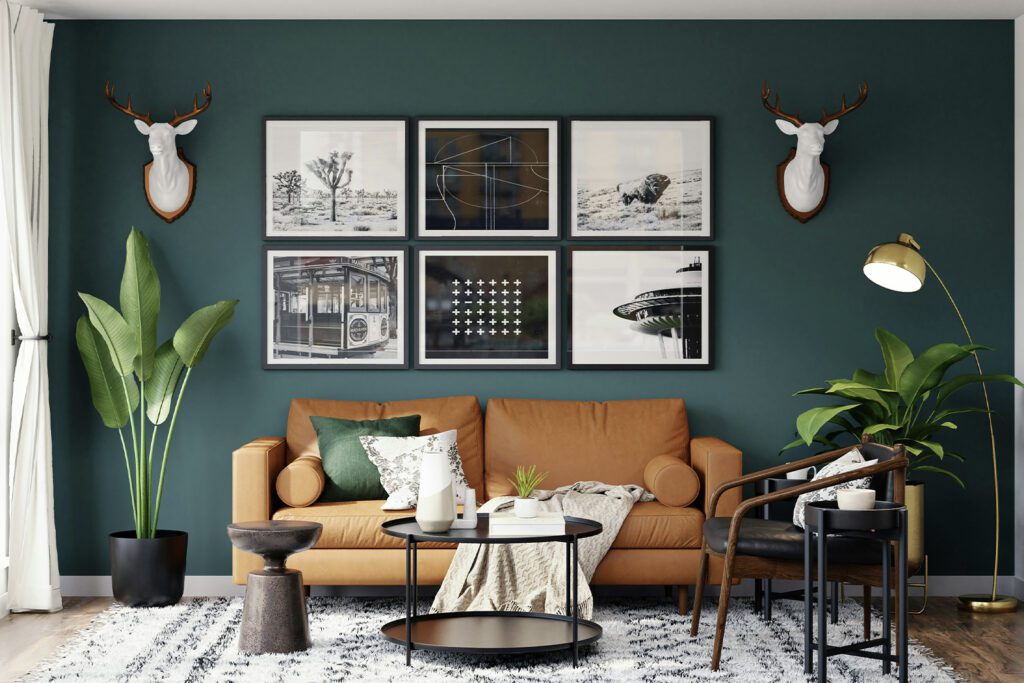
Drew’s Eclectic Gallery Wall

Drew: Because I’m a little more playful and creative than Jonathan (everyone says this about me), I decided to use some mixed media in my gallery wall to really show off my eclectic tastes. Even with this variety of sizes and frames, though, I did stick to a few rules of thumb—namely, symmetry. You’ll notice the gallery wall is balanced in form and color, without straying too far beyond the edges of the furniture space.
I also didn’t use anything that protruded too far from the wall, like a shadow box (nothing like hearing a crash and seeing one of your guests frantically picking up old mementos from the floor). I enjoyed making this gallery wall because I was able to repurpose some old frames without them looking out of place—in fact, I’d say they add to the look with a good balance of old and new. With all this talk about balance, you can tell I’ve had Feng Shui on my mind lately.
Jonathan: The great thing about gallery walls is how much personalization you can get out of them, for not a lot of money. It’s a great day project that can help commemorate your favorite people and moments.
Drew: Wait, then why wasn’t your gallery wall just pictures of me?
Jonathan: I think you know why.
What You Need to Get Started
- Drill with drill bits
- Nail filler (hey, mistakes happen!)
- Paint brush and touch-up paint that matches your wall color
- Painter’s tape
- Your favorite wall decor, art, and framed photos!
More Wall Art Design Inspiration


Shop Wall Decor


Make Your Room Pop With Scott Living Wallpaper
Refresh your walls—and cabinets, bookshelves, and more.
Read More


